Step by Step guide to install Android Lollipop on Nexus
Update: The below process was written for Android L Developer Preview, but will work absolutely fine for Android Lollipop as well.
Google announced a major UI refresh and system update for Android, currently called as “Android L” during Google I/O 2014 on June 25th, 2014. Google also released a Developer Preview version of Android L. The final release will be available by the end of 2014.
Being as curious as I am, I happen to flash it on my Nexus 7 (2013) successfully. Below are the exact steps I took to install the Preview version of Android L. If you have a Nexus 5 or Nexus 7 (2013) model, then you can also give it a try. Follow along:
Step by step guide to install Android Lollipop on a Nexus Device?
Step 1: Making Device Ready for Install
Before you can install a new OS on your device, make sure it is ready for install. Also make sure that you have taken proper data back up of everything you care about on your device currently. To make the device ready, follow the steps below:
- Go to Device Settings -> About Tablet (or Phone)
- If you have never enable Developer Option, then you need to tap 7 times on “Build Number” to activate Developer Options in settings. By default this option is hidden.
- Developer Options should be enabled now on your device. Tap on it and check on “USB Debugging”.
Step 2: Make your computer ready for installation
Now you need to make sure that the computer you want to use is ready for installing Android on your device. You will need to download bunch of things and install in proper folder.
(Note: If you don’t feel comfortable doing these things, please don’t. Wait for Google to release it for public use. There is a big chance you can make your device unusable, if you don’t follow the steps properly. The following steps assumes that you are familiar with Android app development or at least want to get familiar with.)
If you are reading further that means you want to give it a try… 😉 Well in that case:
- Make sure Java is installed on your computer. If not, go ahead and download the latest Java Development Platform. JRE won’t work, you need JDK (Java SE Development Kit).
- Install Android studio from Google for Windows. Follow instructions on this page to make sure it recognizes Java, else further steps won’t work.
- Assuming you went this far, now it is time to launch Android Studio.
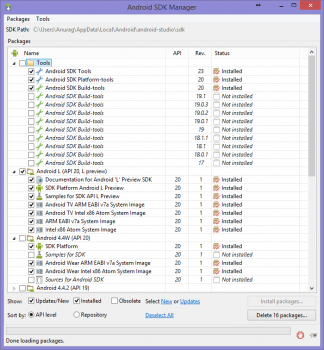
- Now go to SDK Manager and select the required packages for Android Lollipop as shown below.
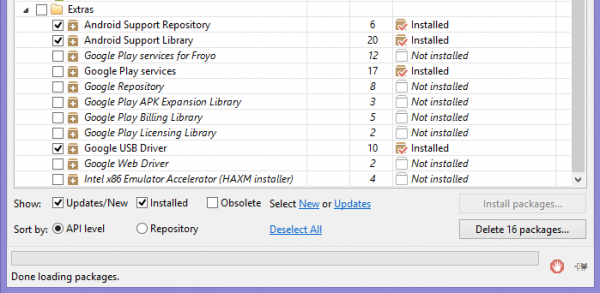
- We need to also include the latest Google USB Drivers and other necessary packages from SDK Manager.
- So you now have the latest ABD and Fastboot application. Confirm from the Android Studio install directory. You will see two files adb.exe and fastboot.exe in platform-tools folder under sdk.
Step 3: Download Android Lollipop system image
Now that both of our devices (computer and tablet/phone) are ready for installation, we can now go ahead and download Android L system image.
- Go to Android Lollipop Factory Images and download the package necessary for your device. For Nexus 7 the file is named as razor-lrx21p-factory-ba55c6ab.tgz. Download this file for Nexus 7. If you are trying with Nexus 5, then download the other file, not this one.
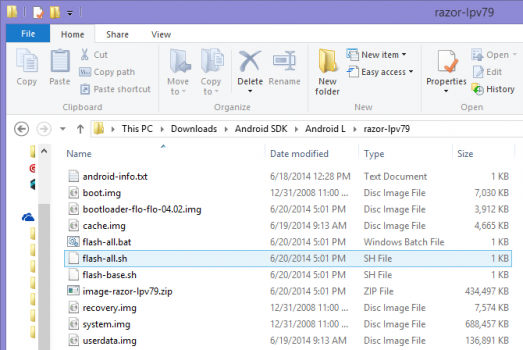
- Unzip the file to a folder. Remember to unzip it to go from .tgz to .tar, then from .tar to .zip. I used 7-zip application to unzip this file. If you don’t have that application, download it for free from internet. The final folder with all the files will look like as shown below. Make sure you see an important file “flash-all.sh”.
Step 4: Finally, the time to install Android L preview
Well, now that you have come this far, Delhi is not too far then. 🙂 Follow the steps below to install Android Lollipop now on your Nexus device. The easiest way to install the required packages on your Nexus is by using Android Studio.
- Launch Android Studio and connect your device to your computer over USB.
- Go to your Computer – > Device Manager. You should see that one of your device (your Nexus, in fact) needs a driver. Right click on this device and follow instructions on this page to update Nexus driver to the required version. (Don’t miss this step, else the system won’t recognize your device for installation.)
- On the top menu, select Tools – > Open Terminal. It will give you the terminal on the bottom of the screen where you can enter the necessary commands to flash your device. Enter the following commands and follow instructions on your device screen.
- Enter “adb reboot bootloader”. That will reboot your device and show the bootloader with big Android robot in the center.
- Now enter “fastboot oem unlock” in the command terminal. The device will now show a confirmation screen. Select appropriate action. The device will not reset and erase all data on Nexus.
- Go back to terminal and now navigate to the folder where you downloaded and unzipped the system image files in last step of step 3 above. You need to use simple commands like cd \ and cd <directory name>/…<folder name>
- Once you are in this folder, pass the command “flash-all” to execute the script. This script will install the necessary bootloader, firmware and Android L operating system on your Nexus.
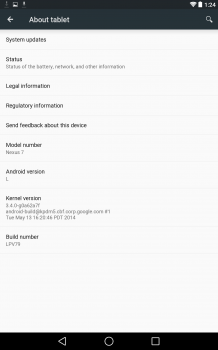
- It will generally take 5-10 minutes and after that your device will reboot. Check the device setting and about tablet/phone, you should see the following information.
- Enjoy Android Lollipop on your Nexus.
If you ever want to go back to the factory version, follow the same steps but this time select the appropriate factory images from here.
Hope this tutorial was easy to follow and I provided all the necessary information and instructions. If you faced any issues along the way but figured out a way, please add the steps in the comments so others can also benefit. I will also get a chance to update this tutorial.
Share with your friends who may want to try Android Lollipop too and can’t wait for Google to push an OTA. 🙂



This thread is getting a little old now.
I guess the android studio looks different now.
step 4 and 5 i am not sure where to find the menu in the android studios. looks like the menu has changed a bit.
I am going to try to update my Huawei as it locked in its factory version after i rooted the phone.
Step number 6 makes no sense. What exactly are we suppose to type into the terminal? Besides that, this helped out a lot 🙂
Sorry that you had trouble understanding the instructions. With Step 6, you need to just navigate to the folder using terminal where you have the required files.
Hope that makes some sense now.
Thanks
thanks. it worked for me
You are most welcome my friend.